Get ready to add some sparkle and shine to your wine collection with this sparkling DIY tutorial on how to glitter a wine bottle. Transform your ordinary wine bottle into a dazzling work of art that will catch the light and captivate your guests.
Just imagine your wine bottle transformed into a shimmering masterpiece, like a starry night sky or a glistening diamond. With just a few materials and a little bit of creativity, you can create a stunning centerpiece or a unique gift that will leave everyone in awe.
In this tutorial, we will guide you through the step-by-step process, from preparing your wine bottle to applying the glitter and letting it dry. So grab your materials, unleash your inner artist, and get ready to make your wine bottle shine like never before.
Let’s dive into the world of glitter and create something truly magical!
Table of Contents
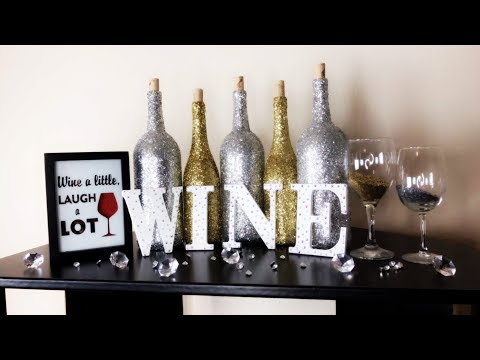
Related Video: "Bae on A Budget: Cheap DIY Home Decor (Glitter Wine Bottles)" by FeedMeGlitter
Key Takeaways
- Glittered wine bottles can be transformed into sparkling works of art with just a few materials and steps.
- The key materials needed for glittering a wine bottle include glitter, Mod Podge or glue, a foam brush, and a tray.
- The process involves preparing the wine bottle, applying a layer of Mod Podge or glue, sprinkling glitter generously, and smoothing out the glitter for a polished finish.
– Glittered wine bottles can be used as decorative accents in various ways, such as on a mantel, as a centerpiece, or to add elegance and sparkle to a room.
Gather Your Materials
Now you’re ready to gather all of your materials, so grab your wine bottle, glitter, Mod Podge, a foam brush, and a tray to catch any excess glitter.
Let’s begin by discussing the materials needed for this sparkling DIY project. First, you’ll need a clean and empty wine bottle. Choose a bottle that has a shape and color you love, as the glitter will enhance its beauty.
Next, gather your glitter. You can choose any color or combination of colors that you prefer. Make sure to have enough glitter to cover the entire bottle.
Additionally, you’ll need Mod Podge, which acts as both a glue and a sealer. This adhesive will ensure that the glitter stays in place and gives your bottle a long-lasting sparkle.
Lastly, grab a foam brush to apply the Mod Podge and a tray to catch any stray glitter.
With all your materials ready, it’s time to move on to the next step and prepare your wine bottle for the glitter treatment.
Prepare Your Wine Bottle
First, grab a glass bottle and give it a good wipe down to make it as clean as a whistle. Before you start adding glitter, it’s important to prepare the surface properly to ensure that the glitter adheres well and lasts.
Start by removing any labels or stickers from the bottle. Soak the bottle in warm, soapy water for a few minutes to loosen the adhesive, then gently scrape off any residue with a plastic scraper or your fingernail. Once the bottle is label-free, rinse it thoroughly to remove any soap residue.
Next, it’s time to clean the bottle to create a smooth surface for the glitter. Mix equal parts of white vinegar and water in a spray bottle. Spray the mixture onto the bottle and use a clean cloth or paper towel to wipe it down, paying attention to any stubborn spots. The vinegar will help remove any dirt, grease, or fingerprints that may interfere with the glitter’s adhesion.
After you have thoroughly cleaned the bottle, it’s important to let it dry completely before moving on to the next step. You can either air dry it for a few hours or use a hairdryer on a low, cool setting to speed up the process.
With a clean and dry bottle, you are now ready to apply the glitter and transform it into a sparkling masterpiece!
Apply the Glitter
To apply the glitter to your wine bottle, start by applying a layer of Mod Podge or glue all over the surface. This will act as a base for the glitter to stick to.
Next, sprinkle the glitter generously over the bottle, making sure to cover all areas evenly.
Finally, take a paintbrush and gently smooth out the glitter, ensuring that it adheres well to the Mod Podge.
Apply a layer of Mod Podge or glue
Start by spreading a layer of Mod Podge or glue all over the wine bottle to create a sparkling base for your glitter. This step is crucial in ensuring that the glitter adheres well and stays in place.
If you don’t have Mod Podge on hand, don’t worry! There are plenty of Mod Podge alternatives you can use, such as white school glue or even clear drying craft glue. These glues work just as effectively in holding the glitter in place and creating a beautiful sparkling effect.
Make sure to apply the glue evenly and cover the entire surface of the bottle. Once you’ve applied the glue, it’s time to move on to the next step – sprinkling glitter over the bottle to add that extra touch of sparkle and shine.
Sprinkle glitter over the bottle
As you let loose a sprinkle of stardust, watch as the magic unfolds and transforms the ordinary into a dazzling wonderland. Here are three exciting things to consider when sprinkling glitter over your wine bottle:
- Glitter color options: With a wide range of glitter colors available, you can unleash your creativity and choose the perfect shade to match your style or occasion. Whether you prefer a classic silver sparkle, a vibrant gold shimmer, or a bold pop of color, there’s a glitter option to suit every taste.
- Different bottle sizes: From mini wine bottles to standard-sized ones, you can experiment with glitter on various bottle sizes. Smaller bottles can make adorable decorative accents, while larger bottles can become eye-catching centerpieces. Choose the right size to achieve the desired effect and make a statement with your glittery creation.
- Add a touch of personalization: Take your glitter game to the next level by incorporating additional elements. Consider using adhesive letters or stickers to spell out a special message or add a monogram. You can also experiment with patterns, such as stripes or polka dots, using painter’s tape as a guide.
Now, let’s move on to the next step and use a paintbrush to smooth out the glitter for a flawless finish.
Use a paintbrush to smooth out the glitter
Get ready to experience the magic as you gently glide the paintbrush over the sparkling masterpiece, revealing a flawless finish that’ll leave you in awe.
Using a paintbrush to smooth out the glitter is a crucial step in achieving a professional and polished look for your wine bottle. As you brush over the glitter, the bristles of the paintbrush will ensure that the glitter is evenly distributed and adhered to the bottle’s surface.
This technique allows you to control the amount of glitter and create a smooth application, avoiding any clumps or uneven patches. If you prefer a more textured look, you can also experiment with different paintbrushes, such as fan brushes or stippling brushes, to achieve unique effects.
Once you’re satisfied with the glitter coverage, it’s time to let it dry before moving on to the next step of this sparkling DIY tutorial.
Let it Dry
Once you’ve applied the glitter to your wine bottle, it’s important to let it dry completely. This will ensure that the glitter adheres properly and doesn’t smudge or rub off.
Take the time to carefully inspect the bottle for any missed spots and touch up those areas if needed.
By following these steps, you’ll have a beautifully sparkling wine bottle that’s ready to be displayed or gifted.
Allow the bottle to dry completely
After patiently applying the glitter, patiently waiting for the bottle to dry completely is the key to achieving a dazzling and professional-looking wine bottle decoration.
Once you’ve finished applying the glitter, it’s important to handle the bottle with care to avoid smudging or ruining your hard work. Place the bottle in a safe and dry area where it can be left undisturbed for several hours or overnight. This will ensure that the glitter sets properly and doesn’t get smudged or smudged.
While waiting for the bottle to dry, take this time to clean up any excess glitter that may have fallen onto your work surface. Additionally, consider the type of glitter you’re using – fine glitters tend to dry faster than chunky glitters.
Once the bottle is completely dry, you can move on to the next step of checking for any missed spots and touching up if needed, ensuring a flawless finish.
Check for any missed spots and touch up if needed
To ensure a flawless finish, it’s important to carefully inspect the dried bottle for any missed spots and make touch-ups if necessary, guaranteeing a stunning and professional-looking result.
Take a moment to examine the bottle from different angles, paying close attention to areas where the glitter may not have adhered properly. Look for any bare patches or uneven glitter application.
If you spot any missed spots, don’t worry! It’s an easy fix. Grab a small brush and a dab of adhesive. Gently apply the adhesive to the missed spot and then sprinkle some glitter over it. Press down lightly to secure the glitter in place.
This simple touch-up will enhance the overall aesthetic of your DIY project and ensure that every inch of the bottle is beautifully covered.
With the touch-ups complete, it’s time to move on to the next step of displaying and enjoying your sparkling creation.
Display and Enjoy
Now that you’ve successfully glittered your wine bottle, it’s time to find the perfect spot to showcase your sparkling creation! Whether you choose to use it as a centerpiece on your dining table or as a decorative accent on a shelf, the glittered bottle is sure to catch everyone’s eye.
Take a moment to admire your handiwork and bask in the beauty of your sparkling masterpiece.
Find the perfect spot to showcase your glittered wine bottle
Once you’ve chosen the perfect spot to showcase your glittered wine bottle, you’ll add a touch of elegance to any room. Transform your wine bottle into a stunning decorative piece that will catch everyone’s eye.
Here are a few wine bottle decorating ideas and unique ways to use glitter in home decor:
- Place your glittered wine bottle on a mantel or shelf to create a beautiful focal point.
- Use it as a centerpiece on your dining table for a glamorous touch during special occasions.
- Display it in a bathroom to add a touch of sophistication and sparkle to your daily routine.
By incorporating these wine bottle decorating ideas, you can elevate the ambiance of any space. Use it as a centerpiece or decorative accent to infuse your home with style and glamour.
Use it as a centerpiece or decorative accent
Enhance the charm of your space by placing the glittered wine bottle as a captivating centerpiece or stylish decorative accent.
The possibilities are endless when it comes to using it as a centerpiece. You can place it on your dining table surrounded by fresh flowers and candles for a romantic and elegant touch. Or, you can use it as a focal point on your mantel, paired with other decorative items that complement its sparkle.
Experiment with different centerpiece ideas to find the perfect display that suits your style and occasion. Additionally, consider using different glitter colors to match your existing décor or create a unique and eye-catching statement piece.
Whether you choose a classic silver or gold glitter or opt for something bold like a vibrant blue or purple, the glittered wine bottle is sure to draw attention and add a touch of glamour to any space.
Admire your sparkling creation!
Admire your sparkling creation!
Take a moment to revel in the beauty of your shimmering masterpiece, appreciating the artistry and effort you’ve put into creating such a captivating and glamorous addition to your space.
The sparkling wine bottle can be used in various ways to enhance your DIY projects. Incorporating glitter into other crafts, such as picture frames, vases, or even candle holders, can add a touch of elegance and sparkle.
Experimenting with different types of glitter can also create unique effects. Fine glitter will give a more subtle shimmer, while chunky glitter will create a bolder and more dramatic look. You can also try using holographic or iridescent glitter for a mesmerizing effect.
Let your creativity flow and explore all the possibilities glitter has to offer in your future DIY endeavors.
Frequently Asked Questions
Can I use any type of glitter for this project?
Yes, you can use any type of glitter for this project! Mixing different colors of glitter will create a unique effect, like blending different shades of paint on a canvas. Let your creativity shine!
How long does it usually take for the glitter to dry completely?
To speed up the drying process for glitter, try using a hairdryer on a low setting or placing the bottle in a well-ventilated area. To prevent smudging or rubbing off, apply a thin layer of clear sealant once the glitter has dried completely.
Can I use a different type of adhesive instead of the one mentioned in the article?
Yes, you can use alternative adhesives for glittering a wine bottle. There are various options like craft glue, Mod Podge, or even spray adhesive. Each adhesive has its pros and cons, so choose one that suits your project best.
Is it necessary to clean the wine bottle before applying the glitter?
Proper surface preparation is vital for successful glitter application. Did you know that 90% of DIY glitter projects fail due to inadequate cleaning? To clean a wine bottle effectively, use warm soapy water and a scrub brush to remove any dirt or residue.
Can I remove the glitter from the wine bottle if I change my mind or want to reuse it for a different purpose?
Yes, you can easily remove the glitter from the wine bottle if you change your mind or want to reuse it. Simply use a brush or wash it with warm soapy water. As for alternative uses, glittered wine bottles make beautiful vases, candle holders, or decorative centerpieces. Get creative!

